- Most layering problems come from using similar synths that compete instead of complement—this article breaks down how contrast in tone, envelope, and function fixes that.
- Layering opposites (like a digital lead with an acoustic-inspired patch) creates balance and texture without cluttering the mix.
- EQ decisions become easier and more effective when each synth has a defined role—tools like KSHMR Essentials help you shape tone without overprocessing.
- How envelopes define movement. Assigning each layer a role in the ADSR timeline makes the stack feel alive without automation.
- You can control front-to-back depth by adjusting transient sharpness, tone, and stereo width—KSHMR Reverb and similar tools help place layers without losing clarity.
More is more is an easy assumption trap to fall into.
We see choirs of singers or an entire stage of orchestral woodwinds working in unison to create sounds that are larger than life when heard live in a concert hall, so shouldn’t five (or more) saw-based synths get a similar massive sound in our DAW?
But it’s this overlap in tone and movement that makes it harder to shape the sound… let alone mix it, which is why this article is wholly dedicated to breaking down the art of layering synths, for cleaner mixdowns certainly, but also for originality so that you walk away with a dedicated approach to layering and a bigger toolkit for getting a sound that is more unique to you.
Because tools like Symphony 2, KSHMR Essentials, and KSHMR Reverb, you can build stacks that are easier to process and still get a massive sound and are more flexible to work with, without sounding like everyone else, as long as you approach the whole process with intentionality.
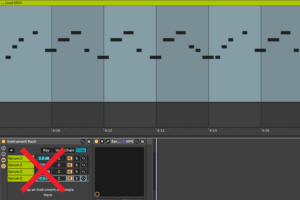
Why Stacking Similar Synths Falls Flat
When multiple layers cover the same frequency range and hit at the same time, they start to blur together; clarity is lost, and the overall punch of the song is obliterated. The most important thing to ingrain into your mindset in the studio is that music, especially club music, is at its best when it delivers one or two ideas as blatantly and obviously as possible.
This obviously applies to the chords and lead melodies, but the same principle applies to sound design.
A bloated stack of 4+ synths leaves you no room to process anything aggressively without smearing the others. You can’t drive your saturation as hard as you want because anything more than a few percentiles on the dry/wet washes out the sound. You can’t drive your compressors as hard as you want, because, instead of the punch and glue they’re supposed to add, you just get a gargled and undefined mess while your headroom disappears before the drop even lands.
Not to belabor the point, but this is important: dance music depends on getting a small number of elements to hit as hard as possible. If you use two or three contrasting layers instead—each doing a defined job—you can push them further, process them cleaner, and make faster decisions.
It also saves your CPU (…and your time)
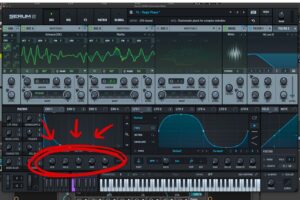
Build With Opposites
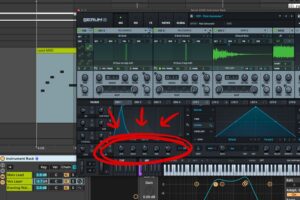
One of the most common issues with newer producers is using too many patches from the same sonic world. When everything in the track feels equally digital, clean, and sterile, the result is predictable—and often lifeless. If the whole mix sounds like it came from a handful of Serum presets with no variation in tone, envelope, or texture, its vibe will be flat no matter how technically clean the mix is.
This is where contrast solves a lot of problems.
On a micro level, combining the precision of a digital wavetable synth patch with something that mimics the expression of a real instrument gives you detail and punch (the best of both worlds type of thing). A sharp, plucky lead which might sound like a dated trance lead from the early 2000s, when layered with something more organic like a vocal stab or light staccato string, makes it feel less artificial and more human.
The X-factor here is to use this principle in interesting, unpredictable ways and find unique combinations of a couple of choice sounds. It’s not entirely unheard of for a transient-heavy foley hit to be the best sample to choose for a synth lead to add a textural burst of energy to a classic synth pluck.
The more out of the box you start thinking here, the less likely it is that some other producer has done the same thing – et voila, you’re the same enough to be familiar to your listeners but different enough to stand out from the crowd!
That doesn’t mean you need an expensive string section recorded in a symphony hall or some other hard-to-find or expensive pack of sounds to sound “professional.”
Packs like Symphony 2 from KSHMR and 7 Skies rework acoustic instruments into expressive, intentionally imperfect Serum presets. They react more like real players than synths—and they drop right into your existing workflow. Pair one with a bright lead or static texture, and you’ll immediately hear the stack open up.
On a macro scale, you can apply the same idea across your arrangement.
Use string-based pads or choir-style textures underneath more aggressive synths; we outline this in detail in an article about layering pad and string sounds. Let the warmth sit behind the brightness. The contrast between movement and consistency gives you more space to push the louder elements without making the mix feel cold or two-dimensional.
These combinations don’t need to be complex—they need to be different enough to give each sound a clear role, and intentional sufficient to feel like they belong together. That’s what actually creates usable texture in the context of the song. Overthinking this step usually does more harm than good—you reach for complex, overdesigned sounds that might be interesting in isolation but don’t support what the track actually needs.
Quick creativity wins here—decide fast, commit early.
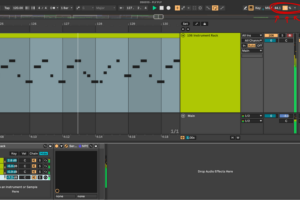
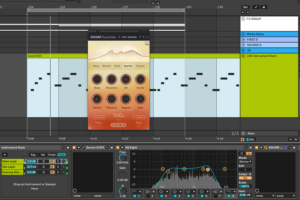
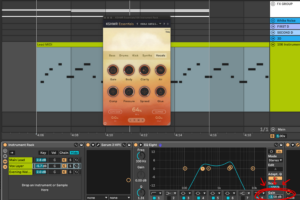
EQ Layers by Function
Every synth in the stack should be EQ’d based on what it’s actually bringing to the table. If it’s carrying the low end, protect the subs. If it’s adding width or shimmer, clean up the mids and center image so it doesn’t crowd everything else.
I try to get in the habit of asking: what are the two or three best qualities of this sound?
Maybe it’s a sharp transient, maybe it’s how the release evolves, or maybe the onboard FX adds a nice wash. Once I’ve figured that out, I’ll throw an EQ on the sound while the whole mix is playing and start pulling back the highs and lows until I start losing one of those key traits. You’d be surprised how much you can carve away without touching what makes the sound useful.
Use broad, musical EQ moves when possible.

Plugins like KSHMR Essentials are built for this—the Body, Air, and Detail knobs let you shape tone without hollowing it out. Be careful with cutting mids or transients on leads—that’s where the character and punch usually live.
Before you even touch EQ, match the gain of each patch. A lot of EQ decisions are really just volume problems in disguise. Once things are level, it’s way easier to hear what actually needs shaping—and what doesn’t. It’s easy to assume that because something’s louder or quieter after some aggressive EQ moves, it’s lost its value in the mix. That’s not always the case. In fact, once you’ve EQ’d something correctly, you can often turn that layer down in the mix and still keep its impact.
It sounds counterintuitive, but think about it: if you can make something quieter and it still adds something meaningful to the track, that frees up headroom. You get more space for a louder master, and the powerful elements—like the kick and bass—hit harder by comparison. Win-win.
EQing is a lot easier when each layer already lives in its own pocket. Build contrast first, then refine.
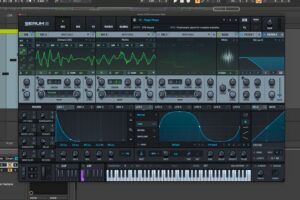
Contrast Through Envelopes
Envelopes shape movement just as much as they shape tone. Once your layers are EQ’d into their own space, this is the next place to focus. When every patch uses the same ADSR, you lose the opportunity to create phrasing and conversation within the sound itself—it all fires at once, leaving the stack feeling flat and overexposed.
But if each envelope plays a different role in time, the whole thing starts to breathe and almost dance within itself.
A simple way to approach this is to divide the stack into three parts: the transient, the body, and the release. You’ve already carved space for each sound sonically—now you’re giving them distinct moments to appear and exit. One patch might punch in with a sharp attack and quick decay. Another could sit in the middle with a rounder tone and steady sustain. The third can stretch the tail, using a longer release, reverb, or modulation to carry emotion into the gaps.
At this point, layering becomes less about stacking cool patches and more about building motion. A dry, percussive hit can act as your attack. A wide, controlled lead might hold the center. The tail can be something subtle and expressive—maybe a reversed vocal chop, a bowed-string patch from Symphony 2, or even an ambient wash shaped to decay slowly over time. It doesn’t need to be complex, just complementary. Sound a bit familiar? It’s the same core principles we discussed earlier, just through a different, potentially more nuanced perspective.
You also don’t need automation for this kind of evolution. The phrase will already have movement if you’re shaping envelopes with intent. And because each layer is already EQ’d for clarity, that movement won’t get lost. The result feels more like a performance than a loop—controlled, dynamic, and alive.
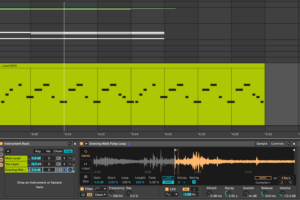
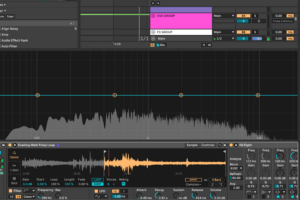
Push and Pull Layers To Create Depth
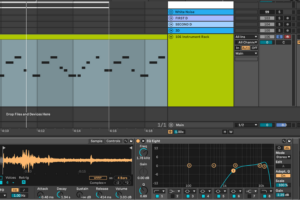
By this point, you’ve probably dialed in each layer’s tone and movement—so the next step is figuring out where they sit in the mix, front to back. In the world around us, we hear depth through detail. Sounds that are close hit harder, with sharper transients and more high-end clarity.
Distant sounds lose definition—they smear and sink. You can use the same logic when deciding how forward or tucked a synth layer should feel.
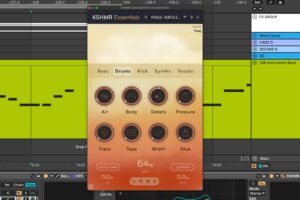
If you want a sound to sit up front, sharpen the attack and focus the highs. The Transients, Air, and Details modules in KSHMR Essentials are great for this—subtle tweaks here can bring a part forward without needing to crank the gain. The goal isn’t to make it louder; it’s to make it feel closer. Just because these features are nested under the Drum menus and modules of the plugin doesn’t mean they are equally as effective on plucks, leads, or anything you want to really POP out of the speakers.
To push something back in the mix, you do the reverse.
- Soften the transient.
- Roll off some top-end.
- Narrow the stereo field.
These choices signal to the listener that the sound belongs behind the lead, without it getting lost or muddy. If you’ve already EQ’d the mids and shaped the envelope intentionally, this last step is where the placement really clicks.
KSHMR Reverb helps too, especially with Auto-Ducking and Tonal Reset. You can shape the reverb tail to bloom after the lead hits, instead of cluttering it. This makes space for the main idea while still giving the background layers motion and presence.
Not every layer needs to carry weight upfront. Once you’ve shaped the tone, the envelope, and the spatial cues, you can start thinking about what deserves attention and what should play a supporting role. Some sounds exist to reinforce the groove, fill gaps, or stretch time between phrases.
Their job is different—but just as intentional.
Unique Combinations Are Harder To Copy
Anyone can load the same preset. What sets a track apart is how those presets are combined, shaped, and positioned across time and space. Layering with contrast gives you more flexibility and control, making your sound harder to reverse-engineer.
That’s the difference between a track that blends in and holds up under repeat listens.
Start building stacks with a clear purpose. Assign roles: one layer for attack, one for tone, one for width or movement. Keep asking yourself what each sound is doing for the track, not just what it sounds like solo. That mindset is what turns off-the-shelf sounds into something personal.
Tools like Symphony 2, KSHMR Essentials, and KSHMR Reverb help you move faster and make smarter decisions. They’re built for shaping tone, space, and depth without getting in your way. Once that contrast is baked into your layers, the rest becomes refinement—less cleaning up, more dialing in. Fewer layers, more intention, better results.
And way more room for the parts that matter!